Setting
Transmit
Audio Gain in OpenHPSDR mRX PS - W1AEX
One of the great things about running
the ANAN rigs with OpenHPSDR mRX PS is
that the developers have made it possible
to get up and running out of the box very
quickly. It's nearly a plug-and-play
operation and it's not unusual to tune
across the band and hear a station that is
on the air only a few minutes after
unboxing their new ANAN. That being said,
the developers have also provided users
with numerous settings that offer lots of
control over the quality of the signal
they transmit on the bands. This quick
setup guide is a simple step-by-step walk
through of how to adjust some critical
settings in the TX audio processing chain
of OpenHPSDR mRX PS. One additional note
to those who are coming from the Flex
version of PowerSDR: Keep in mind that the
entire TX audio chain in OpenHPSDR mRX is
very different from what you worked with
in PowerSDR. It is all new from
front-to-back and the adjustment procedure
in the software is made far simpler by
look-ahead algorithms that prevent
clipping and distortion products in the TX
audio chain. In fact, you will find that
it is impossible to drive the Leveler
beyond 0.4 dB or the ALC
beyond 0 dB. The comments below from
Warren - NR0V (one of the lead developers
of OpenHPSDR mRX) are an excellent
description of what we should aim to do
when setting the levels in the transmit
audio chain:
"To drive the audio chain in
PowerSDR mRX in the way the design
intends, you should be frequently
hitting 0dB on the ALC meter; frequently
hitting 0dB on the Leveler if it is in
use; and achieving 0dB or above on MIC
if the Leveler is not in use. The speech
processor we have in PowerSDR mRX PS is
NOT the old compander that was used some
time ago, it is a much different
algorithm, as are the Leveler and ALC
algorithms."
- For those
operators who know their way
around the setup menus in PowerSDR
mRX simply follow the short list
of 4 steps directly below. Click
on the active links for a more
detailed explanation if needed:
1.
With the TX multimeter set for MIC,
select your source (Mic in, Line in, or
VAC) and then set the audio level so your
voice peaks are regularly reaching
close to 0 dB.
2.
With the TX multimeter set for EQ,
adjust the equalizer sliders for a flat
response, then set the Preamp slider so
your voice peaks are regularly
reaching close to but not
exceeding 0 dB.
3.
With the TX multimeter set for LEVELER,
adjust the Max Gain so voice peaks are
regularly reaching 0 dB.
4.
With the TX multimeter set for ALC,
check to make sure your voice peaks
are reaching 0 dB. If necessary,
adjust the LEVELER so that your voice
peaks regularly hit 0 dB. Note
that this is essential for the Pure
Signal algorithm to operate properly.
Those are the basic steps for setting
up the initial levels in the TX audio
chain. Go ahead and plug your headphones
in, enable the MON function, adjust your
TX Transmit Filter settings, and adjust
your TX frequency response using the EQ
sliders. If desired, enable the COMP
setting and adjust it according to your
preference. Re-check your levels again and
when you are done, save all your settings
into a new TX Profile.
- For
those operators who are new to
PowerSDR mRX, the detailed
step-by-step instructions below
should help you to get your levels
set up optimally.
Steps to
Follow for Adjusting
the Gain Settings Throughout
the PowerSDR mRX TX Audio Chain
1. Connect the ANAN to a 50 ohm dummy
load and select one of the voice modes in
PowerSDR mRX. For now, select the Default
TX profile.
2. If you have the COMP button
enabled on the front panel GUI of PowerSDR
mRX, unselect it now.
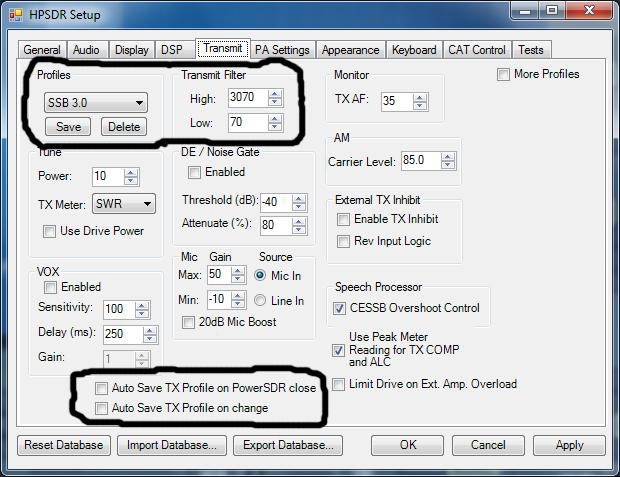
3. In the upper left corner of
PowerSDR mRX, click on Setup and
when the tabbed interface comes up click
on the Transmit tab to bring up
the menu that is shown in the image below.
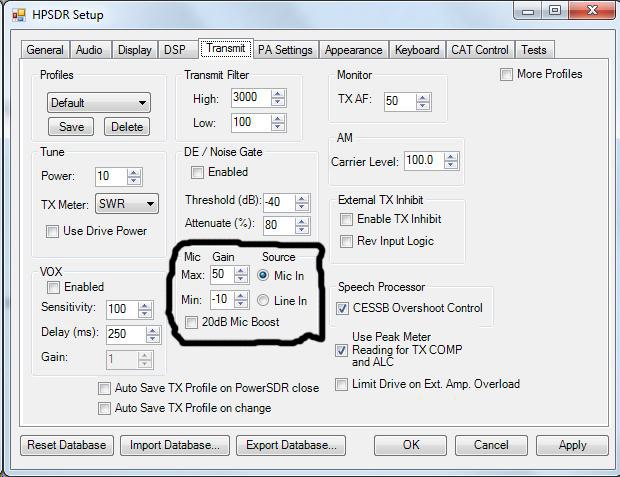
4. If you are using a microphone
plugged into the front panel MIC jack then
select Mic In for the source. If
you are using an external audio chain into
the back panel DB-25 line level input then
select Line In for the source. If
the 20dB Mic Boost option is
checked I would suggest unchecking it for
now. Keep in mind that if your microphone
produces low output then you would want to
come back to this setting and enable it to
assure that enough gain is present to
drive the audio chain adequately.
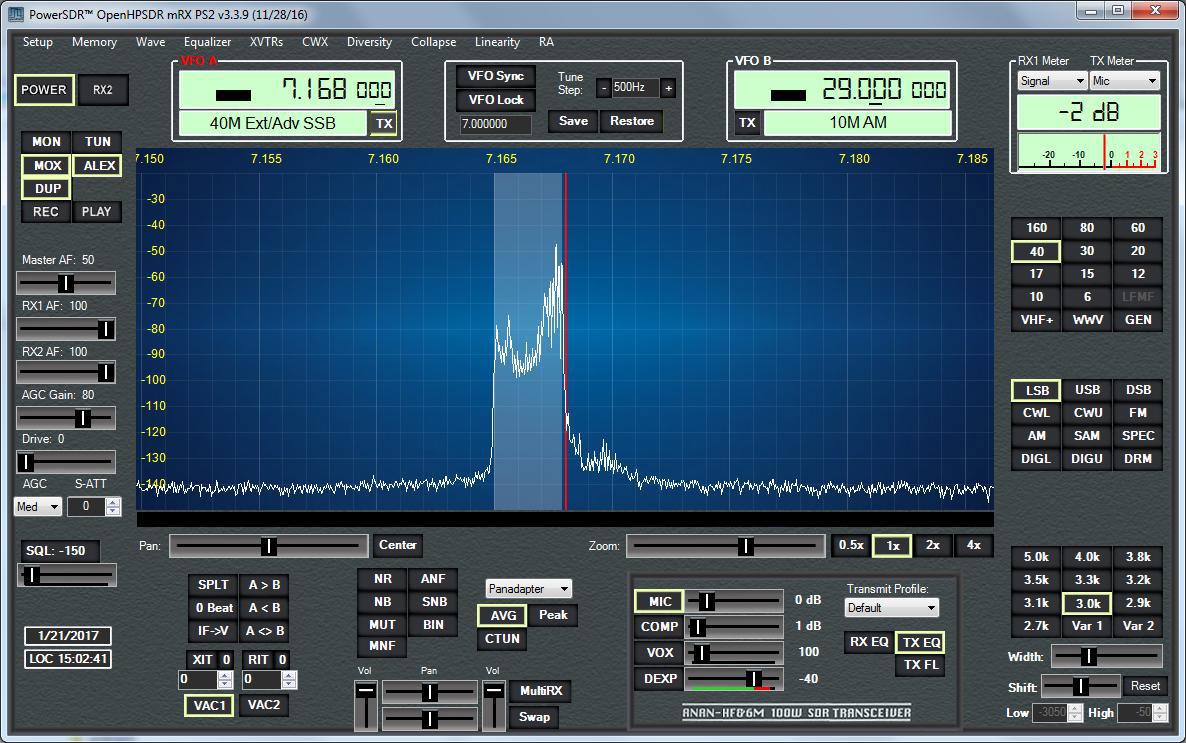
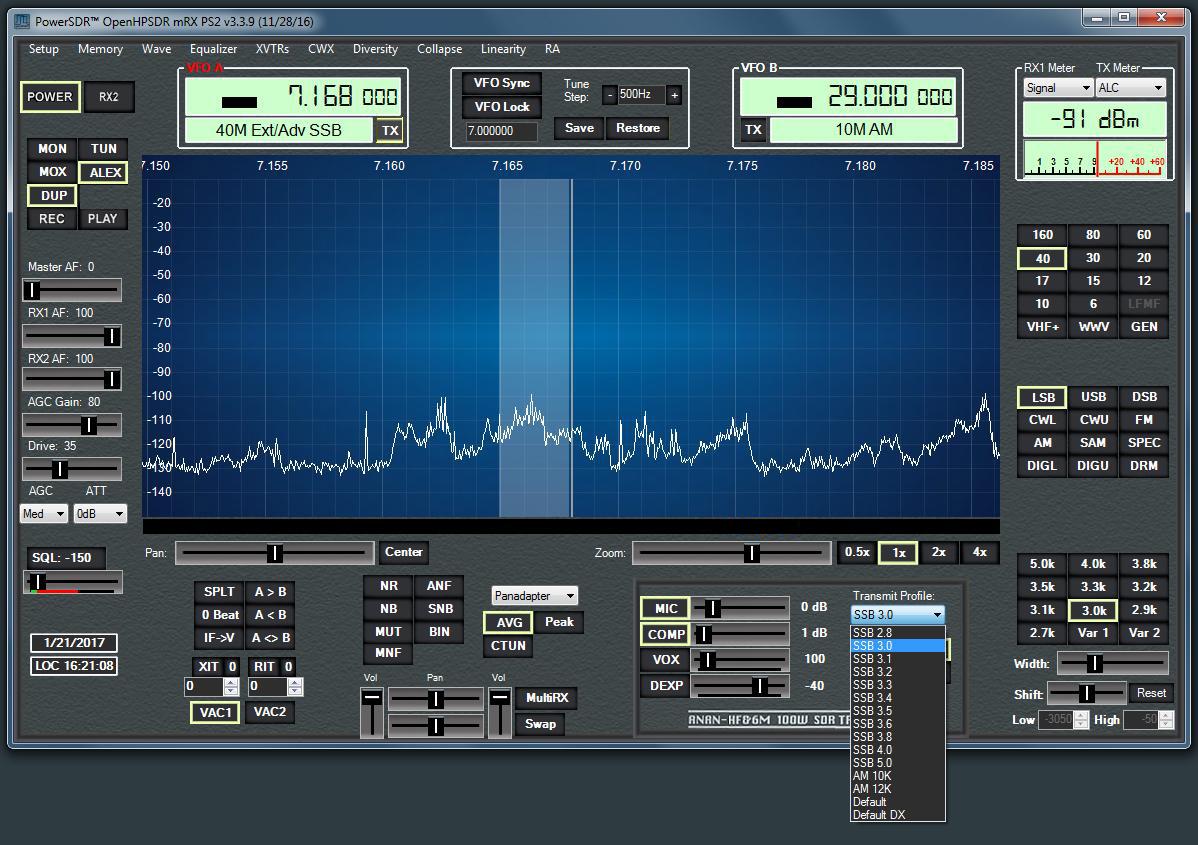
5. In the upper right corner of the
PowerSDR mRX interface use the TX dropdown
in the meter to select Mic as
shown in the picture below. This allows
you to view the level of the first audio
stage of your ANAN.

It's not necessary to produce RF at this
time so slide your Drive level down to "0"
and then switch the rig to transmit. Speak
into your microphone as you would when
making a contact and observe your mic
level in the TX Meter. Adjust this level
so that it reaches close to 0 dB on
voice peaks. Adjust the MIC slider
to the right if you need more gain, or to
the left if you need less gain. If you
find that you are unable to set the gain
high enough, go back and enable the 20dB
Mic Boost setting in the Transmit
tab and try again. When you are getting
close to 0 dB on most voice peaks
proceed to the next step.
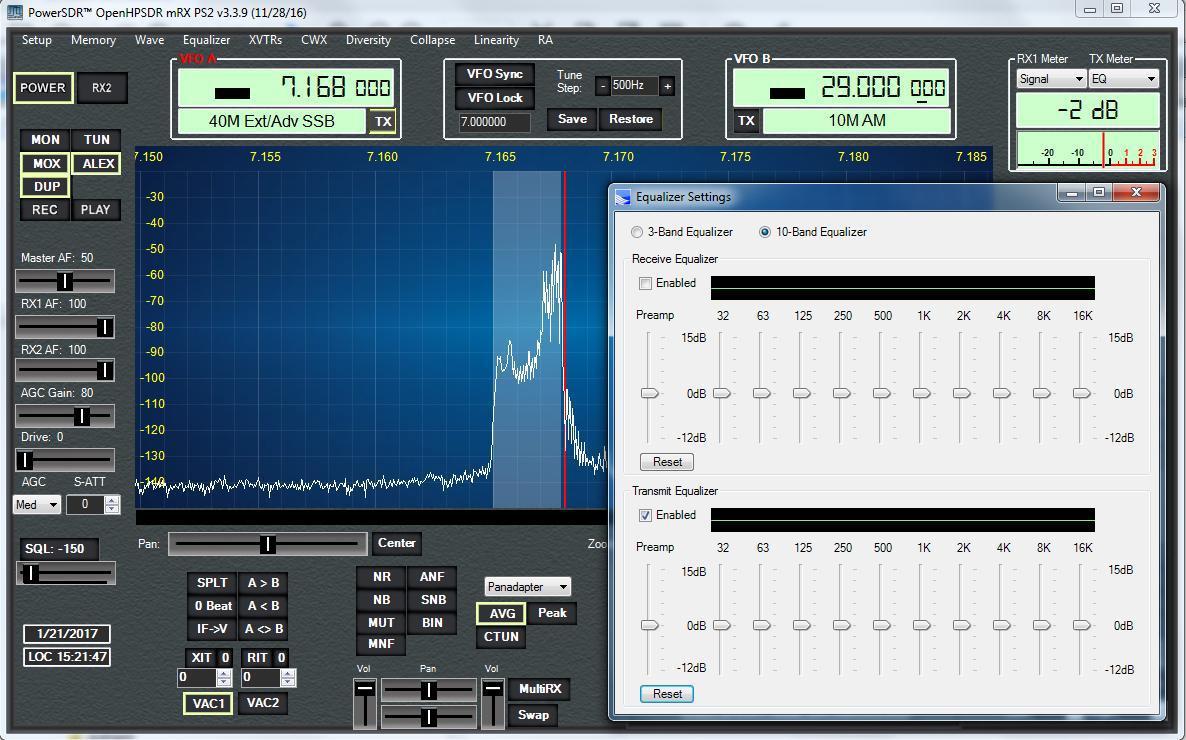
6. Now, press the TX EQ
button on the front panel of the PowerSDR
mRX user interface and then set the TX
meter to EQ. This allows you to
view the level of your second audio stage.
From the drop down menus along the top
left of the PowerSDR mRX interface, select
Equalizer and position it on your
desktop so that you can access the
Transmit Equalizer easily. I would suggest
that you enable the 10 band equalizer
function at this time if you have not
already done so, and for now, leave the EQ
sliders flat.
7. Note that the MIC gain and the EQ gain
are actually two adjustable gain stages in
series, with the output of the EQ stage
being the one that is critical. At
this particular point in the TX audio
chain there is no limiting,
so pushing the peak levels
beyond 0 dB at this stage may cause ADC
clipping which will result in a
distorted TX signal. Observe
the TX meter EQ level as you speak into
the microphone and adjust the Preamp
slider on the left side of the EQ
interface so that your maximum peaks
reach close to but do not exceed 0 dB.
When the level is satisfactory, proceed to
the next step.
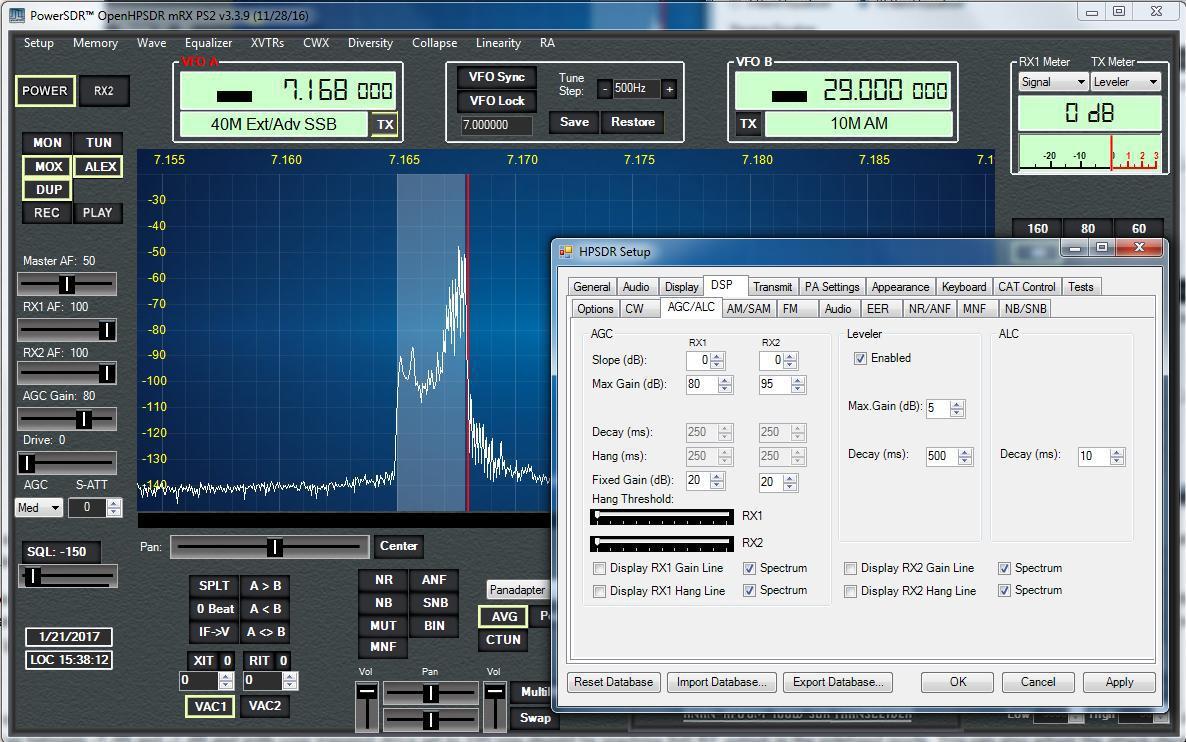
8. Set the TX meter to Leveler.
Select Setup again and open up the
PowerSDR mRX tab for DSP and go to the AGC/ALC
settings page.
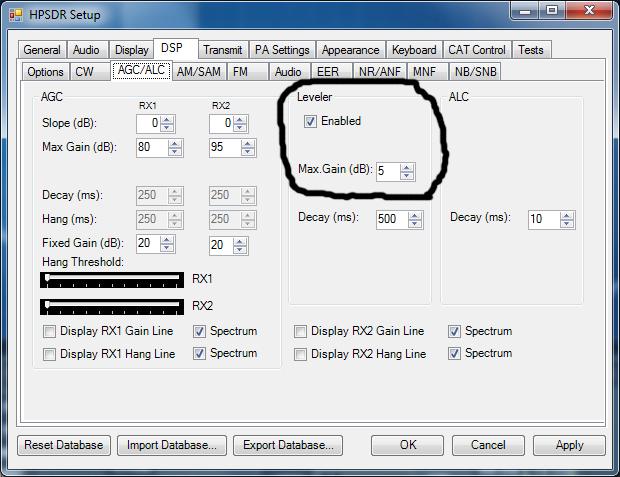
9. As you transmit and speak into the mic,
adjust the Leveler Max Gain (dB)
setting upward or downward from the
default setting of 5 so that your voice
peaks on the TX meter are regularly
reaching 0 dB. You will notice
that one of the look-ahead-algorithms that
is present in the TX audio chain makes it
impossible for you to drive the Leveler
beyond 0 dB. Think of it as a very
effective soft limiter that prevents you
from clipping or distorting but gives you
an impressive amount of control over the
loudness of your transmitted audio. For a
little demonstration of the effectiveness
of the Leveler visit
this page to view a short
video showing how the Max Gain
settings from 0 to 20 sound to someone
else on the receiving end. For now, choose
a value where the TX meter starts to hit 0
dB with every voice peak. Move on to
the next step when you are satisfied with
this setting.
10. Set the TX meter to display ALC
and while transmitting, check to make sure
that you are regularly reaching 0 dB
on voice peaks. If you are not, go back to
the Leveler's Max Gain setting and
increase the value until your voice peaks
push the ALC to 0 dB regularly.
You will note that the look-head algorithm
at this stage makes it impossible to drive
the ALC beyond 0 dB. You can rest
assured that as long as the MIC + EQ level
is set correctly, there are no worries
about distortion as the
look-ahead-algorithms in PowerSDR mRX will
absolutely prevent your ANAN from clipping
and splattering while transmitting. Additionally,
when you engage the Pure Signal
protocol, it is essential to
drive the transmitter hard enough so
that the pre-distortion algorithm
samples the signal frequently as you are
transmitting.

11. I would suggest at this point that you
plug some headphones into your ANAN's
headphone jack and then enable the MON
button in the upper left corner of the
PowerSDR mRX user interface. Bring up the
software Equalizer again and as you
transmit, adjust the equalization of your
transmitted signal to suit your audio
preference. When you are done with the
equalization, check the EQ level with the
TX meter to assure that you are reaching
near 0 dB at this point of the
chain and adjust the EQ Preamp slider as
needed.
Note that when you have finished, your
audio should sound smooth and clean. You
can also create custom transmit filters in
PowerSDR mRX to suit the kind of operating
you wish to do. Go to Setup and
then select the Transmit tab in
PowerSDR mRX. In the upper left corner you
will see the High and Low settings
that you can adjust to create a suitable
filter for your needs. In the example
below, I set the low cutoff to 70 cycles
and the high cutoff to 3070 cycles to
create a filter that is exactly 3.0 kHz
wide. Once you've adjusted your transmit
filter, proceed to step 12 down below!
12. When
you are all done with your adjustments,
do not forget to save them into a TX
profile! Each TX profile saves
many of your operating parameters
including the TX bandwidth filter
settings, front panel Mic setting, EQ
preamp level with either the 3 or 10 band
adjustments, Leveler gain setting, front
panel Compressor setting, and RF transmit
Drive level. If you do not save your
settings, they will be instantly lost
when you switch TX profiles! Before
you save your first transmit profile, set
your Drive level to a setting that you
would typically start out with when
operating. I like to set all my profiles
with the Drive level set to "35" because
that works fine with either of my
amplifiers and is low enough that no major
catastrophes will occur if something in
the station is not set correctly. I figure
that once I'm ready to engage in a QSO I
can manually slide the Drive level to
whatever power level is required for the
occasion.
To save a profile, in the Transmit
tab as shown in the image above, select
the "Save" button and this will bring up
a dialog box that will allow you to save
your new profile with a unique name. I
usually select a name that identifies the
mode and bandwidth for which the profile
was created, but you can use whatever
system works best for you. It would
also be very wise at this point to make
sure that the two Auto Save TX Profile
options (shown in the image above) are
UNCHECKED so that your TX profiles are
not inadvertently altered as you are
operating! As you can see in the
image below, I have lots of different
transmit profiles to suit operation for
different bands, conditions, and modes so
that my transmitted signal fits in with
whatever is being done by others on the
frequency of operation.
Summary: Once you have
gone through these settings a few times
you'll discover many other settings that
are worth investigating. For example, in
the pictures up above showing the Transmit
tab you will see a check box for CESSB
Overshoot Control. When you engage
the COMP button (underneath the MIC
button in the PowerSDR mRX front panel
GUI) this feature comes alive and does a
beautiful job of increasing your average
RF output without creating excessively
large RF output peaks. I keep this feature
alive with all my transmit profiles by
enabling the COMP button and
setting the slider to a modest level of 1
dB and then saving it to each TX profile.
Advancing the COMP level to higher levels
will increase the processing effect if you
wish. Another feature is the downward
expander which is enabled with the DEXP
button. I have no experience with this
setting but Scott - WU2O has mentioned
that changing the attenuation factor to
100% makes it a hard gate. He prefers a
setting of 90% and notes that 80% is too
soft a gate for his use. It's very
worthwhile to experiment with different
settings while monitoring your own signal
with headphones and the MON button
engaged.
There are many more settings to investigate but they go beyond the scope of this simple walk through. Hope this helps you get started!
Many thanks to Scott - WU2O for his
many content and clarity suggestions for
this page!