Setting
Transmit
Audio Gain Distribution in PowerSDR -
W1AEX
I have encountered lots of
Flex/SDR users
on
the air who sound great in every voice
mode. However, it is not uncommon to hear
stations who seem to have a lot of grit,
distortion, and harshness in their audio
in all the voice modes. As it turns out,
many of these stations are completely
unaware of the multi-function TX meter and
how to use it to correctly set the audio
gain distribution throughout the Power SDR
audio chain. It is not unusual to find
that one of the stages is inadvertently
running at maximum gain while another
stage is set near the minimum to
compensate. This can invoke strange events
such as ringing in the audio, distortion,
and aggressive ALC action with pumping and
audio artifacts. I certainly do not know
everything there is to know about
squeezing the most out of the audio
functions in Power SDR, but I did find
that balancing the gain from start to
finish has brought very satisfactory
results for me and a number of others who
were becoming very frustrated. Pages 77
and 78 of the 2.x.x Power SDR manual "sort
of" infer the information given below, but
I have found that many users are
completely unaware of any audio level
settings beyond the front panel Mic
slider. Hopefully the steps below will
help someone to avoid a disappointing
result when they start to transmit!
For those who would like to view a
brief video (less than 10 minutes) that
runs through the basic steps, click on the
play button below. After hitting the
PLAY button please select a player
resolution of 720p HD to see the video
with the best clarity. This setting is
found by clicking on the little icon
that looks like a gear in the lower
right corner of the video player.
Steps to
Follow for Achieving Balanced Audio
Gain Throughout the PowerSDR Audio
Chain
1. Connect the Flex to a 50 ohm dummy load and select one of the voice modes in Power SDR. Make sure that you have a TX profile selected that has your bandwidth set as you deem appropriate for the phone mode you are using.
2. If you have either the DX or Compander button selected on the front panel of Power SDR, unselect it now.
3. The Mic slider on the Power SDR front panel GUI is scaled from 0 to 70. Place it at the mid-point value of 35.
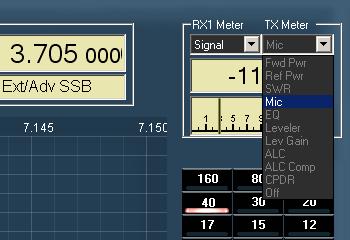
4. In the upper right corner of the
Power SDR interface use the TX dropdown in
the meter to select Mic as shown in the
picture below. This allows you to view the
level of the first audio stage of your
Flex.

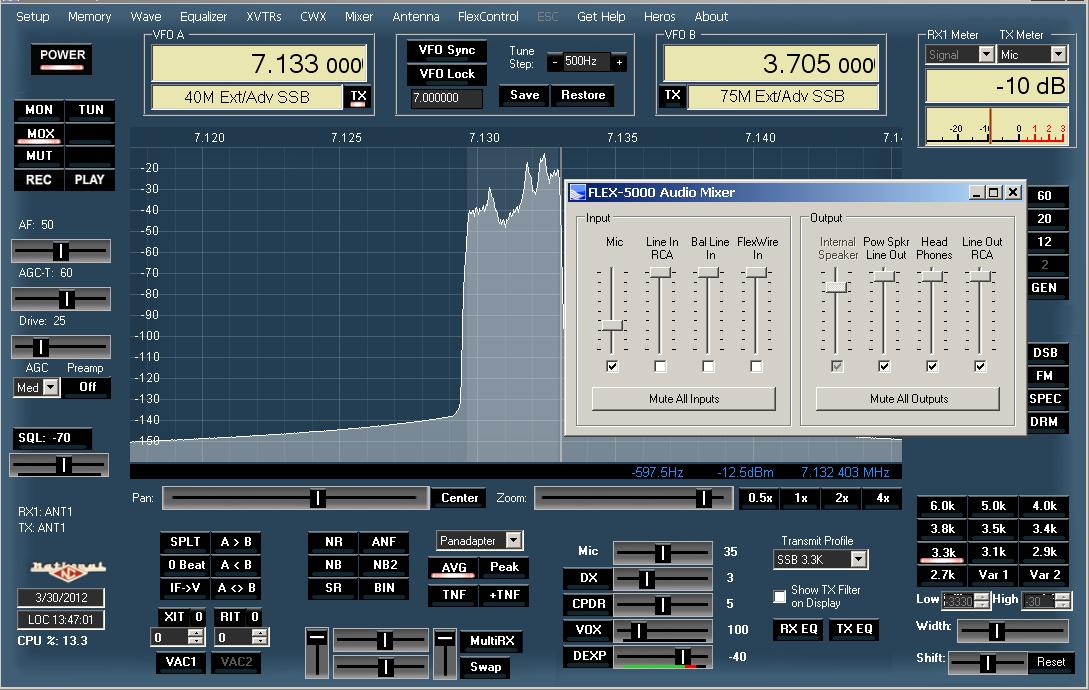
5. From the dropdown menus along the
top left edge of the Power SDR interface,
select Mixer and position it on
your desktop so you can access it easily.
With the Flex connected to a dummy load,
key the transceiver and speak into the
microphone at the voice level you
typically use on the air. Observe the TX
meter Mic
level and adjust your level up or
down with the Mic input level
slider (or the slider for whichever input
you are using) in the Flex Audio Mixer so
that the maximum peaks reach no more
than minus 2 dB. I'd like to mention
that this is an absolute maximum level
that I never
reach while operating. I have found that I
get the best results if I set this stage
up much more conservatively. In fact, as
shown in the meter level displayed in the
picture below, my levels at this stage
average around -15 dB and rarely ever
exceed -10 dB. As someone wisely pointed
out to me recently in an email, this not
"a cookie cutter" kind of thing and your
settings will certainly differ from what
someone else finds to be optimal. A little
experimentation and adjustment of gain
levels at each stage will bring you to a
very satisfactory result as long as you
don't overdrive one stage and then
underdrive another stage to compensate.

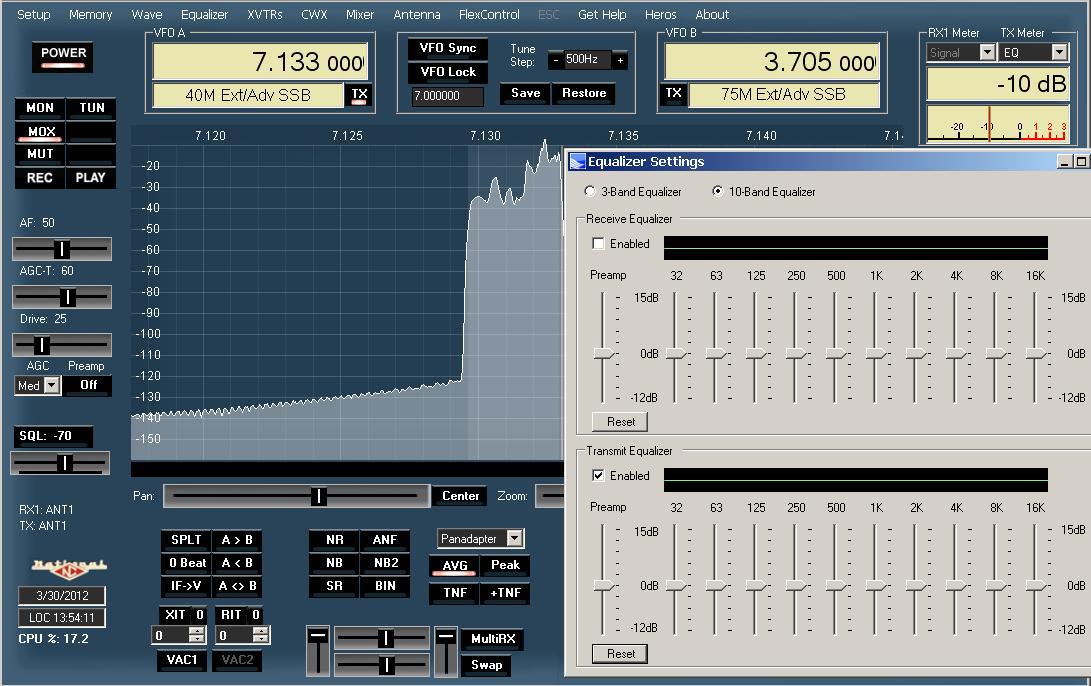
6. Now set the TX meter to EQ.
This allows you to view the level of your
second audio stage. From the dropdown
menus along the top left of the Power SDR
interface, select Equalizer and
position it on your desktop so that you
can access the Transmit Equalizer easily.
I would suggest that you enable the 10
band equalizer function at this time, if
you have not already done so.

7. Observe the TX meter EQ level
as you speak into the microphone and
adjust the Preamp slider in the EQ
interface so that your maximum peaks reach
no more than minus 2 dB. I'd like
to mention again that the -2 dB level is
an absolute maximum level that you should
never exceed. In fact, with my transmit
profiles I have found that I get the best
results if I set this level so that my
average audio rises to around -15 dB with
the maximum peaks reaching to around -10
dB as shown in the picture above.
8. Set the TX meter to Leveler. Open
up the PSDR tab for DSP and go to the
AGC/ALC settings page. As you transmit and
speak into the mic, adjust the Leveler
setting upward or downward from the
default setting of 5 but make sure that
peaks on the TX meter do not exceed 0
dB. You can further adjust the
attack/decay/hang times if the Leveler is
not responding quickly enough, or if it
seems slow to release. This is largely
trial and error, but I found the default
decay and hang times to be too long, and
reducing them smoothed things so that
there was no audible pumping or excessive
periods of gain reduction. (Pages 156 -
157 of the PowerSDR 2.x manual provide
more details)

9. Set the TX meter to ALC. Open up the PSDR tab for DSP and go to the AGC/ALC settings page. Apply audio and observe that the maximum level of peaks does not exceed 0 dB. If everything in the preceding stages has been set correctly, you should see that your maximum peaks will end up between -5 dB and -1 dB and with your transmit drive set to 100 you should be reaching full RF output in the sideband mode. You can also adjust the attack/decay/hang times of the ALC if you see a peak sneaking through now and then. I would suggest increasing the ALC Attack time by increments of 1 ms from the default 2 ms setting to prevent the ALC from intervening too quickly. I have gone as high as the maximum setting of 10 ms and observed that it restrained the ALC very nicely without any negative effects. Again, I found that by reducing the decay and hang times in small steps I could find a setting that resulted in smooth audio without pumping or extended periods of gain reduction. If your ALC levels are still exceeding 0 dB on any peaks, reduce the leveler setting or simply reduce your Mic level by using the slider on the Power SDR front panel GUI. If you find that your peak RF power output is low with the transmit drive set to 100, go back to the Leveler control and raise the Max Gain setting to increase output. The Leveler has the ability to raise the gain by as much as 20 dB, so there is plenty of audio gain available if you find you need it. Again, when you are done, check the ALC to assure you are not exceeding 0 dB. This is most accurately done by selecting the ALC Comp view with the TX Meter. If the meter deflects upward this is an indication that you need to drop your audio gain. There should be a sweet spot where full RF output can be seen without driving the ALC beyond 0 dB. Keep in mind that everyone's setup is a little different. The goal here is to find settings that achieve fairly equal gain distribution throughout the software audio chain. The worst possible scenario occurs when an early stage is overdriven and a following stage is underdriven in an attempt to compensate.
10. When you have finished, your audio should sound smooth and clean. If your transmitted frequency response is not to your liking, the 10 band TX equalizer built into Power SDR works very well and is more than capable of making up for deficiencies in whatever microphone you have selected. Always remember that after you EQ your audio, you should go back through the steps to compensate for any changes in gain.
11. When
you get all done with your adjustments,
do not forget to save them in a TX
profile! Each TX profile saves
its own bandwidth filter settings, front
panel Mic setting, DX-Compander setting,
EQ preamp level with either the 3 or 10
band adjustments, Leveler setting, AGC/ALC
attack and decay, and RF transmit level.
If you do not save your settings, they
will be instantly lost when you switch TX
profiles! To save a profile, from the
dropdown menus along the top left edge of
the Power SDR interface, select Setup.
From the available tabs that are
displayed, select Transmit. On the
Transmit tab, in the upper left
side, find the box named Profiles.
Select the Save button and this
will bring up a dialog box that will allow
you to save your new profile with a unique
name. I usually select a name that
identifies the mode and bandwidth for
which the profile was created, but you can
use whatever system works best for you.

Summary: When your levels are set correctly throughout the audio chain, engaging reasonable levels of the Compander or the DX function should result in a very significant loudness difference in your signal, without invoking the ALC or producing any signs of ringing or distortion. It's possible to produce very clean and beautifully balanced audio with the Flex and as long as the gain is set correctly at each stage, it should sound smooth and natural.
Using a cheap electret condenser mic, made from a $2.79 Radio Shack element and a few resistors and capacitors, plugged right into the front panel mic connector of my Flex 5000A, I have received many unsolicited compliments about the audio generated by the Power SDR audio chain. The short MP3 file at the link below of my "naked Flex 5K" was sent to me by Jeff - W2NBC, who was tuning by one winter afternoon as I was running AM on 75 meters. I don't think there's any other multi-mode rig out there that can touch the transmit audio generated by the SDR platform!
http://www.w1aex.com/psdrgain/flex5kAM.mp3